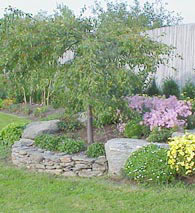
Consider making curved, raised beds in your landscape out of natural materials, such as stone, to create additional visual interest.
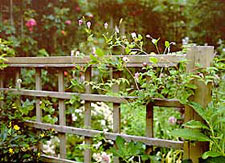
Fences offer places for plants to grow and a way to distinguish one area of the garden from another.
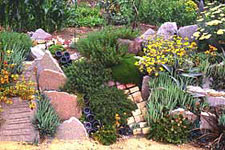
Don't forget simple natural elements, such as rocks in the garden. They help break up a planting bed and can double as stepping stones.
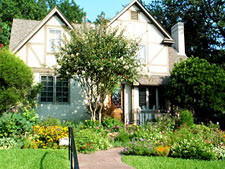
Don't be afraid to grow your edible flowers, shrubs and trees in the front yard where everyone can appreciate them.
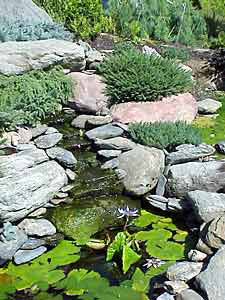
Simple water gardens provide habitat for frogs, dragonflies and exotic plants.To keep mosquitoes away, place mosquito dunks in the pond or raise fish.
Since we're talking about edible trees, shrubs, and flowers, you might want to find a few different people to help you, such as one who is a specialist in edible crops and another who is a more traditional designer who can put the plan all together. But first let's start with exploring your dreams.
Your Landscaping Scrapbook
In an effort to be as specific as possible, the first step into your new landscape is a purely imaginary one -- a scrapbook filled with images that appeal to you. These could be images not just of plants and gardens but of structures, walkways, walls, fences, ornaments, and other landscape features. Here are the supplies you'll need to assemble: a binder, approximately 200 sheets of binder paper, scissors, several sharp pencils with good erasers, tape, ruler, and a few sheets of standard graph paper.With these materials plus an armful of home and garden magazines, your job is to create your own personal garden design scrapbook. The scrapbook will be invaluable on trips to the nursery, hardware store, or lumberyard, and it will help you avoid disappointments when you deal with contractors, carpenters, bricklayers, concrete masons, and landscapers.
If you take the time to create a binder filled with the specifics of what you like in a garden, you'll go a long way toward answering questions decisively. Instead of waving your hands in the air and hoping for the best, your landscaping binder will allow you to point to the exact thing you want: "I want this type of walkway with this type of crushed stone."
Each time you see something appealing in a photograph or illustration, cut the picture out of the magazine and tape it to a piece of binder paper. Be sure to make notations on the paper as to what it is, specifically, that you like. Three months later, in an entirely different frame of mind, you may find yourself wondering what it was in the photograph that caught your eye.
Three-Dimensional Thinking
Once you've collected your ideas, it's time to make use of that graph paper, but heed this warning: While virtually every book ever written on the subject of home landscaping stresses the importance of committing a plan to paper, the precise nature of the process presents some hazards to creativity. Yes, it is important for you to know the dimensions of the lot, which direction the prevailing winds blow, what the exposure of the yard is (morning or afternoon sun or shade), the location of water spigots, electrical outlets, etc. But there's something about putting these facts down on paper that makes it possible to design the life and spirit right out of the project.If you think you may be subject to the tyranny of graph paper, neutralize its effect by starting the composition of the plan outdoors. To do this, take your landscaping scrapbook to the yard, along with a few dozen 12-inch wooden stakes, a half dozen 6-foot, 2- by 2-inch wooden stakes (available at any lumberyard), a spool of heavy cotton string or twine (500 feet should do), a couple of long garden hoses, two handfuls of clothespins, and a few old bed sheets. An odd list of equipment, to be sure, but useful.
Put your equipment aside for a moment, and take a good look at your scrapbook. What have you got? You may have some ideas for fences, a play area for the kids, a deck or patio, perhaps an arbor, some fruit trees, an outside eating and cooking area, a vegetable garden, an expanse of grass laid out with lawn games in mind, or even a water garden. Your challenge is to arrange the elements you want in the space available. To successfully meet this challenge, you should know every corner of your yard intimately. You may think you know it already, but you'd be surprised at how many people are locked into only one viewing position, usually about 6 feet away from the back door!
Getting to Know Your Yard
Get acquainted with your yard by walking its perimeter all the way to the edges of the property. While you walk, keep looking back at your house. Is there a spot, somewhere toward the rear or to the side of the yard, where the view of your house is particularly pleasant? Would this be the best place for a small, freestanding deck or patio, just right for a couple of chairs? Or is there a spot beneath a group of mature trees at the back of the yard that you discover to be delightfully shady?The next step is putting mock-ups of the various elements into position using the stakes, string, and sheets. Any rectilinear feature, such as a deck, patio, or sandbox, can be outlined using the stakes and string. Simply pound the stakes a few inches into the ground, and tie the string around the stakes to show the outline. Curved areas, such as planting beds, are easily outlined using a long garden hose (or several hoses connected together). Adjust the curves in the hose until the shape is pleasing from all angles, including from the window inside the house where it will most often be viewed.
To a person with little or no involvement in your landscaping design process, this mocked-up backyard may appear a motley mess. Where someone else sees only a sheet hanging from a line, you see a brick and latticework fence. That garden hose lying in a curve on the ground isn't just lying there, it's marking the boundaries of a lush vegetable bed. The best part of this exercise is the three-dimensional quality it gives your emerging plan, something almost impossible to achieve with only pencil and paper, which happens to be the next step.
Committing the Plan to Paper
Leave the stakes, sheets, and hoses in place for a couple of days, or weeks, if necessary. See how the arrangement looks at different times of the day and in different weather conditions. Once you're comfortable with the layout, get out the tape measure, pencils, and paper.Here are the steps to putting your landscape plan on paper:
- Draw a rough map. On a large notepad, sketch out your yard, including buildings, large trees and shrubs, property lines, fences, utility lines, paved areas, patios, pools, and other permanent features. Don't worry about accuracy yet. Using a compass, find the direction of north and mark it on the map.
- Measure permanent objects. Measure the features, such as house and pool dimensions, tree and shrub drip lines (the circle on the ground made by water dripping off the plant's outermost leaves is called the drip line), and lengths of fences. Add the measurements to the rough map. Also measure and locate windows and doors, as well as outside faucets, lights, and electrical receptacles.
- Establish accurate locations. Using stakes and string, mark a straight line along a property boundary, starting at one corner. Keeping the tape measure at a 90-degree angle from the boundary, measure the distance from the boundary to the nearest corners of the house, trees, and other objects on your map. Measure from other boundaries, too, to confirm accuracy.
- Include wish list items. Measure the outlines of your intended deck, patio, play area, shade trees, vegetable garden, herb garden, flower beds, or whatever it is you're considering. To correctly position everything on the plan, you'll need to measure in from the lot line, just as you did with your house.
- Transfer measurements to graph paper. With a ruler and pencil, transfer your measurements accurately to graph paper. Use 1 inch to represent 4 feet for small yards, 1 inch to 20 feet for larger sites.
- Make tracing paper overlays. Tape the base map to a table or board. Lay sheets of tracing paper over it and make additional maps, each with a different theme, such as sun and shade patterns, slopes, views, gardens, and traffic patterns. Each map becomes a layer that adds detail to the base map but remains separate for clarity.
It All Comes to Life
Now's the time for you to face another kind of reality: the fiscal kind. Putting cost estimates together can be a very time-consuming job, and you may decide to leave it to a professional. This, of course, depends on whether you intend to do the work yourself or hire someone else to do it for you. Although this is largely a personal decision, it should be pointed out that most yard construction (with the exception of pools, fountains, and sophisticated electrical work) is well within the ability of a person with average mechanical aptitude. If you enjoy these kinds of projects, by all means, have at it; you'll save considerable labor charges and experience a great deal of pride once the landscaping project is completed.If, however, you decide you have neither the time nor the inclination to do the landscaping yourself, a variety of professionals and semiprofessionals are available. The type of help you choose depends both on the complexity of your plans and on any personal contacts you have in the field. You may be better off using someone with whom you have a relationship that goes beyond a mere contract.
Once the construction of your landscape actually begins, an odd thing happens. As soon as the first section of fence is hammered into place, or your future herb garden starts to fill in with the delicate sprouts of your favorite edibles, your imagination takes over and completes the project in your mind's eye. That's why ground-breaking ceremonies attract so much attention. A landscaping project that you may have discussed for years is finally on the way to becoming reality.
See also: Vegetable Garden Design http://www.garden.org/ediblelandscaping/?page=planning101
No comments:
Post a Comment