Saturday, April 30, 2011

AN ABUNDANCE OF POTATOES.


With a bit of luck I can manage to grow several crops of potatoes each year, planting the first seed potatoes in October with a further planting after Christmas. Potatoes will handle quite rough soil so are a good crop to put into new ground. They are not a deep rooted plant like carrots, which will push down into the soil. Instead, the tubers grow out from the original seed potato. It is necessary to hill them as the plants grow to cover the young tubers. If you keep building up the soil around the stem of the plant they will continue to make fresh tubers in ever increasing layers. This may also be done by creating a support for the soil with rubber tires mounted on rubber tires. This is a great way of cropping for people with limited gardening space. Using this method it is also possible to grow potatoes in the milder winter climates, providing the tops are covered each night against frost.
Potatoes are well suited to growing in furrows which can be flooded with a garden hose and is the way I prefer to grow mine. To get an early start this year I planted two rows of seed potatoes in October amongst the red Flanders poppies in my Remembrance Field at Das Helwig Haus B&B at Glen Aplin on the Granite Belt of southern Queensland.
Potato rows
Potato rows
Three young Koreans came in November to work for me as WWOOFers – Willing Workers on Organic Farms and as the poppies finished flowering they removed them and hilled the potatoes.
Hilled potatoes
Hilled potatoes
Meanwhile I had planted a later patch of potatoes, a different variety, on the opposite corner of the field. My non-organic vegetable farming neighbors when given fresh potatoes in February, asked what chemicals I had used on the crop?
I replied, “None.” One of the secrets to growing good crops of any vegetable is to rotate your crops and never grow potatoes in the same place for at least 3 years. Repetitive growing of the same vegetable in the same ground each year will not only result in depletion of soil nutrients essential to that plant, but also a build up of pests – either leaf feeders or root borers. Potatoes appreciate feeding on rich compost or manures and need plenty of water during the growing season. I prefer to buy fresh seed potatoes each year, rather than use left over shooting potatoes from my pantry to avoid spreading any disease.
A second crop of potatoes.
As the leaves ripen up the plants tend to fall over to the side and it is important at that time to ensure the tubers close to the surface are covered with additional earth or a mulch of hay to prevent sunburn and greening. Any potato exposed to the sunlight will acquire green skin. This green portion of the potato is poisonous and any potato showing green should be peeled deeply, or discarded.
Korean Wwoofers digging potatoes
Here the three Koreans (Ashley, Jack and Jinni) were harvesting Sebago potatoes. Jack is using a brand new stainless steel digging fork, which my father gave me for a Christmas present. The other varieties I grew were Kennebeck and Desiree. Again to avoid possible contamination of my soil, I do not compost my potato greens, but burn them. If it is possible to establish a different place each year where you can burn garden waste and then plant vegetables like melons or pumpkins in the ash, you will be rewarded with excellent crops as the heat destroys the natural pathogens lurking in most soils.
Jack washing the potatoes.
The potatoes were washed, sorted according to size and stored in our cellar room at 8 degrees Celcius.
Stored potatoes
Stored potatoes
I’m sure you know many ways of serving potatoes, but have you ever made your own potato crisps?
  • Choose small to medium potatoes of an even size.
  • Wash potatoes, but don’t peel.
  • Slice the potatoes as thinly as possible. I have a meat slicer which cuts much thinner and neater slices than I could manage with a sharp knife.
    Slicing potatoes.
    Slicing potatoes.
  • Thread the potato slices on to wooden skewers.
  • Sprinkle salt or other flavoring over the potato slices.
  • Suspend three skewers across a microwave safe bowl.
  • Place the bowl in a microwave oven and cook for 7-10 minutes. The time required will depend on the thickness of your slices.
  • Remove from the microwave oven, cool and strip off the skewer.
  • Store in an airtight container for future use as potato crisps.
    Raw, salted potato slices.
    Raw, salted potato slices.

    Cooked potato crisps.
    Cooked potato crisps.
  http://fayhelwig.com/self-sufficiency/green-garden-12/#more-795

The Best Tomatoes for Sauce: San Marzano Tomatoes


Ask any chef and they’ll tell you that San Marzanos are the best tomatoes for sauce.
The flesh of San Marzanos is thicker and meatier than other sauce tomatoes, they have fewer seeds, a bolder flavor, and they’re less acidic. The end result? These tomatoes just melt into sauces.
To prep San Marzanos for sauce, you first have to remove the skin. Fill a large pot with water and bring to a boil. Drop in a few San Marzanos (you may have to work in batches) and boil until they’re skins start to blister (about 1-3 minutes). Remove the tomatoes from the water using tongs, a slotted spoon, or a Chinese skimmer and immerse them in a bowl of ice water. Once the tomatoes are cool enough to handle, use your hands to peel off the skins.
Next, chop off the tops of the tomatoes and slice away any tough flesh, bruises, or rot spots. To remove the seeds, cut the tomato in half lengthwise and gently scrape out the seeds using a small spoon or your finger. At this point, the tomatoes are ready to be frozen or canned.
Removing the skins and seeds from San Marzanos makes for an extra velvety sauce. Try using San Marzanos in this simple Garlic Tomato Sauce for pasta or pizza. They’re also perfect in ratatouille.
Look for fresh San Marzano tomatoes at your local farmers market. You can also find canned San Marzanos in specialty stores or larger grocery chains. http://eatdrinkbetter.com/2010/08/10/san-marzano-tomatoes-the-best-sauce-tomato/

Backyard Landscaping on a Budget

Landscaping adds a finished touch to a home like nothing else can. Beautiful hedges, flowering perennials and neatly edged gardens complete the exterior of a home. Landscaping on a budget begins with the knowledge that you'll be doing your own work. Hiring a contractor to beautify your backyard offers a beautiful landscape and an empty wallet. You'll need to arm yourself with knowledge about landscaping, soil preparation and the best plants for your area to create a plan for the ideal backyard landscape.
  1. Creating a Plan

    • Grab a piece of graph paper and sketch out your home exterior, including any permanent features. If you have a plan, you'll be able to control the spending. Backyard landscaping often presents difficulties with design and expense because of the increased amount of space. Focal points can be just about anything from a pool to a special tree or plant, a wooden deck or patio. Choosing a center point helps with symmetrical design, as well as limiting the expense of plants and shrubs.
      Choosing a few types of plants and scattering these throughout the landscape creates a sense of unity to the backyard. In the same vein, choose three to four colors of flowering annuals or perennials for a sense of continuity. Vary heights of plants in a single garden with tallest at the center or back, working by height to the lowest plants in the front. This gives the illusion of many plants in the garden. If you've got a fence, don't assume you need to line the fence with a long rectangular garden. Save money and create a pleasing landscape by simply creating an irregularly shaped garden in the corner of the fence.

    Choosing Plants

    • Variegated hosta.
      Plants often overwhelm new landscapers with choices and decisions. Landscaping tends to be a rather permanent addition to your home, so you want to do it right the first time. Consult with your local garden center for recommendations before making any purchases. Always read the attached information tab on every plant for sale. These cards provide planting information, sunlight requirements and watering recommendations. Save money and time by doing research to choose the best plants for your backyard.
      Annuals offer immediate color but only last one season. Perennials and shrubs bloom year after year and often expand in size. This expansion often results in thinning, which creates more plants that will need a home in your backyard. Keep propagation in mind when initially purchasing plants. Plants can be quite expensive, but it lessens the punch a little when you realize you'll get more than one plant out of a gallon pot.
      Choose plants that grow best in your area and limit the number of chosen plants. Although your garden might seem sparse the first year, new growth and expansion will use up those blank spaces quickly. Add any choices to your backyard design plan. Make sure you take into account any soil conditions, as well as shade/nonshade areas before making any plant purchases.

    Soil Preparation, Mulch and Edging

    • Consider any purchased plant an investment that needs a proper place to thrive. Most likely, your backyard is unconsolidated fill dirt put in place by the builder. Soil preparation will help protect your investment and should be figured into your landscape budget. Add soil conditioners, such as peat moss and compost, by simply dumping these products into the garden area. Turn over the top 12 inches of soil with a rototiller or by hand.
      Mulch adds a finished look to any landscape and aids your plants by retaining water. Mulch has the added benefit of suppressing weed growth. Bags of mulch cost about $3 (sometimes less on sale), and you just can't beat this addition for creating a groomed look to your backyard. This investment also helps over time as the mulch breaks down and enriches the soil. Edging around the gardens also adds a finished look to the backyard and helps retain the mulch inside the garden. Garden borders come in many materials, such as plastic, wood or more expensive stone.   http://www.ehow.com/way_5272329_backyard-landscaping-budget.html

How to Landscape on a Small Budget

How to Landscape on a Small Budgetthumbnail
Plan carefully to make the most of your landscape dollars. Sketch out your yard and include the contours of your home along with any patios or decks, walkways, driveways, paths, flower beds and retaining walls. Add features you want, and then split the project into phases so you can complete a little at a time to minimize the amount of money you need to spend all at once. Consider setting up a consultation with a landscape architect and having her look over your sketch. You can get advice for much less than you would spend if you had the plans drawn up from scratch.

Difficulty:
Moderate

Instructions

    • 1
      Use gravel, concrete pavers or poured concrete for the most inexpensive paths and walkways. If using gravel, select small pieces of angular gravel (labeled "1/4-inch minus") for the least amount of slippage underfoot. Avoid pea gravel or other smooth stones. Attack weeds as you see them pop up.
    • 2
      Furnish existing decks and patios with inexpensive seating and occasional tables. Check big box stores, thrift stores and yard sales. Deals can often be found at summer's end. Dress up the area with a thrifty outdoor rug, some plants in containers, and perhaps some garden-style wall art. Add tiki torches, outdoor lamps, post lights or candle lanterns for evening ambiance.
    • 3
      Add a do-it-yourself water feature. Liners, pumps and fountains are available at home improvement stores and can easily be added to your yard, deck or patio. Create a retaining wall wherever you need one using textured concrete blocks made for this purpose. A trellis or arbor is another easy addition and can be enchanting and create privacy.
    • 4
      Sharpen lawn mower blades approximately every six weeks during summer months so the lawn stays healthy. Use thin layers of chopped-up grass clippings and some slow-release nitrogen to fertilize the lawn and help keep it green. Consider planting fescue seed, which is drought-resistant and doesn't need a lot of fertilizer to flourish.
    • 5
      Outline new flower beds with a garden hose to achieve contemporary curved shapes, and then install edging to define the beds and keep the lawn from encroaching. Enrich the soil properly with compost and other add-ins according to the advice of nursery personnel or the cooperative extension office in your area. Mulch with organic materials such as pine needles or shredded leaves, and check with your city to see if it will provide free mulch. You can apply these over layers of newspaper for extra weed control.
    • 6
      Invest most of your plants budget in trees, shrubs and flowers native to your area since these are most likely to flourish. Plant perennials and put in fewer than you think you need. You can divide them next year and fill in the beds then. Start plants indoors from seed, purchase plants and trees in late summer when they are on sale.
      It often pays to invest in the biggest trees you can afford since they grow slowly and larger ones have much more impact on a landscape. However, investigate carefully. With some species, smaller trees are set back less by transplanting than larger trees, and will actually grow large faster.
http://www.ehow.com/how_7591368_landscape-small-budget.html

Wednesday, April 27, 2011

Organizing Seed Packets

Hey guys!! I’m so glad you could join me, Jill, Amy, and Megan for another awesome Homestead Barn Hop! It has been so much fun visiting everyone’s homesteads and seeing what you’ve all been up to! Keep the great ideas coming!

This weekend I’ve been working on organizing my entirely-too-many seed packets. For a newbie like me, it’s hard to keep track of what to plant when, what to start indoors, what to direct seed, etc. when all I can see is a stack of seed packets in a tub. Sorting through them one-by-one trying to figure it all out just wasn’t working for me. I needed a better system.
So, I searched the house and found a plastic storage container with a lid that I thought would work perfectly for my project. Using large index cards, I made monthly dividers to file the seed packets under.
Next, I went through my stash of seeds and sorted them into groups: produce, herbs, and flowers.
Garden Produce Seeds
Starting with the fruits and veggies, I looked up each plant to find out when was the best time to plant that particular seed in my area. I also noted whether it should be started indoors, and what that start date was, or if it should be direct seeded into the garden. Once I knew when I needed to worry about dealing with that pack of seeds, I could file it under the correct month.
So, for instance, in March I have: spinach, lettuce, swiss chard, carrots, and parsnips.
On the back of each index card I also have written which seeds should go under that month, and whether they should be direct sown or started indoors, plus any other helpful tips I may want to remember.
Herb Seeds
Next, I worked on sorting my cooking and medicinal herbs. I’ll file them by month as well, though most of them are to be planted at about the same time- after the danger of frost. Some are to be started indoors (which I probably should have already done a couple of weeks ago), so I’ll get on that this week. I’m researching the herbs more thoroughly though, since the majority of them are perennials and will only need to be planted once. I’ve been looking each one up, determining when to plant, how to plant, and where to plant (full sun/part shade), and how tall they will grow.
I’m charting what I’m finding about each plant, so that I can map out where I will put them. I’m also writing any specifics about that plant on the seed packet so I won’t lose the information. I’ll file them away in my box once I’m done.
Flower Seeds
In the wipes container in the back of the box is where I have all of my flower seeds. This will be the first year I’ve even bothered with flowers. Now that I know how important they are for attracting pollinators though, I don’t wanna be without them! Plus… they’re pretty. And some of them make great companion plants for the veggies in my garden.
I’m not filing them by month since pretty much all of them are to be sown outdoors after the last frost, though some needed to be started indoors, in which case I’ve begun doing so.
I’m thinking this will be a great way for me to stay on top of things and not fall behind. It’s easy to miss planting something, or get a late start, when it isn’t laid out nicely for you.
Do you organize your seed packets in any particular way? I’d love to know what you’ve found to work best for you!
If you’ve done something constructive this week, learned something new, or tried a new recipe, be sure to link up below and share what you’ve been up to! It’s always fun hopping from homestead to homestead for even more inspiration!
  http://newlifeonahomestead.com/2011/03/mondays-homestead-barn-hop-organizing-seed-packets/

Blossom End Rot!


Here is a picture of a tomato with blossom end rot. (although since peppers are in the same family as tomatoes they can get it as well and just as easy)

Symptoms can occur at any stage of development in the tomato. But it seems most common, when the tomato is one-third or half of its full size. The name sorta says it all, it starts only at the blossom end of the tomato. Starting with small water-soaked spots, which get bigger then turns dark quickly as the fruits develop. The spot may get big enough to cover one third or half of the entire tomato's surface! Basically at that point the fight is over, and that tomato is a goner. I usually pick them and toss them away.
If you have seen this tomato sickness, if you have it or had it last year. You know that it usually does not just effect 1 tomato on a plant. It was probably in the majority of your entire crop, and up to 90% of the tomatoes on each plant. The severity can vary, from very bad to maybe just a few bad tomatoes.
I personally have seen them both. I started out several years ago with just a small problem, but over the years it grew to almost taking my entire crop. That is when I decided to learn all about this disease. And I found a simple solution.
Now I could go over the long drawn out reasons of why, and all of that jazz. But it is just a lot of long words and yada yada. Simply said here is "easy" explanation, which probably wont do the disease justice. Basically the tomato plant is having a hard time getting adequate water and nutrition to the plant. Part of that could be due to clay soil. Soil can always be the culprit. Sandy soils will have the same effect. Could be periods of drought, then lots of water. Could be to much water, or inconsistent watering. But for some reason your plant isn't able to grow a good root system, thus making the plants susteptiable to disease.
Solution-
If you have clay soil can I suggest you add lots of organic material? Clay soil is a common problem in vegy gardens. Clay soil just isn't great for growing, even weeds sometimes. The same can be said of Sandy soil. So add lots and Lots of organic material. Every Year. But that may only just start to solve this problem of Blossom end rot. Although I would hope it would end the problem.
Next make sure that you are consistent in watering. Make a schedule and stick to it. Now, I am not suggesting that you become a Nazi. Just water every other day on a drip system for 15 minutes, simple. In the real heat of the summer, I water every day. But I know lots of people that don't. Just watch your plants, don't let them wilt. (If they are wilting, re-evauate your watering entirely) Other watering suggestions for tomatoes and most all garden plants is, don't water over head. Meaning turn off the rain bird. I will explain more on that in my next post.
If you have taken care of everything else, meaning. Your soil is in good shape, watering is handled and you are taking the opportunity to possibly fertilize with a simple 4-12-4 or 5-20-5 fertilizer, every other week but still have a problem. Add lime. Simple powder lime from the garden department should end this problem entirely. Lime isn't bad for the body (through tomatoes) is organic and just promotes healthy tomatoes. Every year I add 1 tablespoon to the hole that I put my new tomato starts into. I would rather not bother worrying about whether blossom end rot will happen at all.
Several years ago, when I had blossom end rot for the last time. I added lime to the top of the soil next to the tomato, (because I didn't at the beginning of the year) then worked it in around the tomato. Watered as usual. I also plucked all the effected tomatoes off and chucked them. I ended up with a substantially smaller crop because of what I had lost. But everything started to grow 100% rot free after that. I cant promise that will be your experience, but if you remember: Soil, Water, Fertilizer, Lime I think you will have amazing tomatoes every year!
Happy Planting!

I am determined to explain


This will be a short post, but very important. I am putting the SMACK down on my kids with the house today, so I need to put my attention there. But at the same time, this is THEE MOST asked question I get at the greenhouse or at home from anyone about tomatoes!

What is the difference between Determinate & In-Determinate Tomatoes? The answer is simple, and I am going to give you a "cheat" so you wont forget.Both of the terms are simply how the tomato will grow and produce. So first ask yourself, "What am I buying this tomato for?" Are you canning, or just eating? This is important when purchasing one of the two different kinds of tomatoes. Here is the reason...
Determinate tomatoes will all grow and ripen close to the same time, within a few weeks. Meaning the plant grows to a certain size, then grows the tomatoes, then they ripen. Pretty much that is the end of that tomato plant. These are the best tomatoes to use if you are canning.
Indeterminate tomatoes grow and fruit and grow and fruit. The plant continues to grow throughout the growing season and produce tomatoes. Never finishing growing, never finishing fruiting. Pretty much that will continue to frost.. These tomatoes will often ripen earlier than Determinate varieties. These are the tomatoes you want if you are just eat'n, mak'n a little fresh salsa & not canning.

Now for the "cheat" I use. I say, the Determinate tomatoes are DETERMINED to all be ripe at the same time. Left over is the Indeterminate and they just don't care. How easy is that?
Next time you head to the Greenhouse to pick a tomato plant, I hope this will help with your selection. I will spent the next few post talking more about tomatoes. I will add my favorite varieties in the coming posts. I get so many questions about Tomatoes, seems like I should spend some time on them. For right now, I think I will head out to my garden, grab a nice juicy tomato and get back to the house.
Happy Planting...    http://gardeninggoodies.blogspot.com/search/label/Tomato

Old Fashioned Bleeding Heart

Dicentra spectabilis... That is one of those long names that no one really understands. But all of the "cool" gardening people like to say. Hey, it makes us feel cool. And this really is a Cool plant. This Shade loving perennial, is a must for you.This pretty flower loves the shade. Do not even consider it in the sun. It also loves a moderate amount of water. That is easy, because when this little beauty is blooming usually it is still raining. It blooms in early Spring to Late Spring. The blossoms are pink or white. Obviously it gets its name from the blossom.
Give this perennial a 10-10-10 mixture or time release in the spring. It is really incredibly easy to grow. But don't expect that it will bloom much longer than the spring. You may get foliage, but you wont get anything else in the heat of the summer. It just goes dormant, so watch that you don't dig it up. My Bleeding Hearts just continue to get bigger and bigger each year. And in their little spot in my garden, they are welcome to. If you dead head this plant, it will extend the life of the flowers.
The best way to propagate this plant is to divide it. Wait until it is well established, at least 3 years before you do. It will do some self sewing, but is really not invasive.

If you are trying to create a sweet English cottage looking garden, you cant go wrong with the Bleeding Heart...
Happy Planting
  http://gardeninggoodies.blogspot.com/2009/04/old-fashioned-bleeding-heart.html

Tuesday, April 26, 2011

How Can I Save Cucumber Seeds?

Cuke Seeds
How can I save seeds from cucumbers that I grow?
In order to save seeds from cucumbers, you must let them thoroughly ripen on the vine. They will enlarge and turn yellow. They should stay on the vines until the vines are dead. Bring the cucumbers into the house and let them ripen further on a dry shelf in the pantry (or someplace out of direct sunlight). When the cucumbers begin to turn soft, scoop out the seed mass and put it into a large jar of water. Let the seeds ferment for five days, thenseparate the scum from the good seeds that have sunken to the bottom. Rinse the seeds in a colander, then dry hem on screens for at least three weeks, or until the seed snaps when bent in half. Store the seed in airtight containers, label and date clearly. Store the containers in a cool, dark place free of humidity. Seed processed properly will remain good for at least eight to 10 years.
William Woys Weaver, contributing editor, MOTHER EARTH NEWS and Gourmet magazines
Photo by IStockPhoto/Maris Olsteins

http://www.motherearthnews.com/ask-our-experts/saving-cucumber-seeds.aspx

How to Save Tomato Seeds


Image by: wintersown
It's nice to be able to save your own tomato seeds!
You may have brought home a particularly delicious tomato from the supermarket, or gotten an heirloom tomato from a Farmer's Market, or grown one in your own garden that is so wonderful you want to save the seeds from it and grow them next year. Nothing ever tastes quite as good as a home-grown tomato!
So, how do you save the seeds? The method is easy to do....it's a little gloppy, and it's a little funky, but you'll be able to save seeds in a manner that will lesson the occurence of tomato disease while giving you plenty of seeds to germinate, and with left-overs to share or trade. This seed saving process is a process of fermentation.
Select to save seeds from a tomato that has a flavor that you love....if you're a home gardener and saving seeds from tomatoes that are growing in your garden choose tomatoes from the very healthiest looking plants.
Take your chosen tomato and slice it in half across the middle (it's "equator"). With a spoon or your well-washed fingers scoop out the seeds and their gelatinous "goo" into a clean cup or container. Add a couple of tablespoons of water to the seeds. Cover the container with a piece of plastic-wrap and then poke the plastic-wrap with a paring knife or pen point to put a small hole in it...this is to allow for air-transpiration. (A little fresh air needs to get in and out of the cup to help foster fermentation.)
Place the container of seeds in a warm location; a sunny windowsill or the top of the refrigerator are both excellent sites to place the container of seeds. Now Mother Nature will take over and begin to ferment the seed and water mixture. This takes about two or three days. Each night remove the plastic-wrap, stir the seed and water mixture, and then replace the plastic-wrap, if you use a new sheet of plastic-wrap then don't forget to put a small hole in it for air-transpiration. The top of the liquid will look "scummy" when the fermentation process has seperated the "goo" from the seeds. It also helps destroy many of the possible tomato diseases that can be harbored by seeds.
Take the container of fermented seeds to the sink and with a spoon carefully remove the scummy surface. Then pour the container's contents into a fine kitchen sieve and rinse the seeds with water several times...stir them while they're in the sieve to assure that all surfaces are thoroughly rinsed. Give a few sharp taps to the sieve to help remove as much loose water as possible from the seeds.
Line an open plate with a piece of waxed paper or a large automatic-drip coffee filter. Place the rinsed seeds onto the wax paper or coffee filter and spread them about so they are in a single layer. Place the plate in a safe location where the seeds can dry for a few days. Stir the seeds a few times during the drying process to assure that all their surfaces are evenly dry. Spread them out again into a single layer after each time you've stirred them. Tomato seeds are thick and can take up to a week to dry thoroughly. If you're having a rainy week that drying time may lengthen by a few days.
How do I know when the seeds are dry? Dried seeds move quickly and easily across a plate, they do not stick to each other.
How do I store them?
I like paper packets or some folks like plastic. Whichever envelope style you choose is a matter of personal preferance. If you choose to store your seeds in plastic the seeds must be BONE DRY....otherwise any moisture in the seeds will be transferred to all seeds inside the plastic packet, it will foster mildew and rotting and the seeds will be ruined.
How do I label them?
Tomatoes are generally self-pollinated so there is rarely a chance of cross-breeding. If you save and trade your seeds you might wish to describe your trade offering as "open-pollinated" tomato seeds. That way the trader knows that Mother Nature was solely involved in the fertilization of the flower which produced the tomato that you have saved seeds from.
Onto the packet write the tomato variety name (if you know it) or a very good description if you don't, add the term "open-pollinated" if you're sharing or trading your tomato seeds, and also add the current year to the packet description.
And that's that! Do enjoy saving tomato seeds and growing your own tomatoes at home from them. Home-saved tomato seeds are a wonderful gift to tuck into a holiday card for when you want to add a "little something extra", or to share with friends and neighbors.

How Do I Grow Herbs in a Window Sill?

How Do I Grow Herbs in a Window Sill?thumbnail
Grow herbs indoors all year long.

Herbs can spice up a meal, fresh herbs can make it even better. Instead of spending money on herbs in a jar, you can grow an herb garden in a sunny window sill right in your kitchen. Grow perennial herbs, such as chives, mint, sweet fennel and lemon balm. Spice up dishes with annual herbs including anise, summer savory, cilantro and dill. You'll have fresh herbs year round without spending a lot of money.

Instructions

things you'll need:

  • Grow lights or fluorescent lights (Optional)
  • 6 to 8 inch deep container with drainage holes
  • Potting soil
  • Water can
  • Tray or saucer
  • Pebbles or coarse marble chips
  • Sharpened pencil
  • Water-soluble fertilizer
  • Paper towel
  1. Give herbs between five and eight hours of sun per day, preferably in a window that faces south or west. Move plants to a different window sill to keep the herbs in the sun, or supplement low light levels using grow lights or fluorescent lights. Hang the lights 12 to 18 inches above the herbs.
    • 2
      Fill a 6-inch deep container with 5 inches of potting soil and an 8 inch deep container with 7 inches of potting soil.
    • 3
      Put the seeds into the potting soil following the directions for planting depth on the seed packet. Transplant herb seedlings from the pot you bought them in a 6- or 8-inch deep pot. Label the pots with the planting date and name of the herb.
    • 4
      Set the pots on a tray or saucer filled with pebbles or coarse marble chips to raise humidity around the herbs. Water the newly planted herbs just until water comes out of the drainage holes.
    • 5
      Check the soil moisture before watering herbs. Stick a sharpened pencil into the soil at the edge of the pot. A damp pencil means there is still moisture in the soil.
    • 6
      Thin herb seedlings to 1 inch apart when the plants have two or three leaves on them.
    • 7
      Apply a water-soluble fertilizer, such as 5-10-10, every two to three weeks if you use potting soil without fertilizer in it. Follow the directions on the label for exact times and amount.
    • 8
      Harvest from one-third to one-half of the bigger leaves on the herb plant at the time flower buds appear. Leave the small leaves on the plants. You can harvest more from annual herbs because they regrow quickly. Wash leaves and stems and let them dry on a paper towel before adding them to food.  http://www.ehow.com/how_7187770_do-grow-herbs-window-sill_.html

The Window Herb Garden

Why Choose a Windowsill Herb Garden?
Window Herb GardenGrowing your own window herb garden can be fun, rewarding and it can save you a lot of money. Any professional chef or even part time, for fun chefs can tell you that the most costly ingredients in any dish are the herbs. Even though you'll only use a pinch of this herb or a dash of that herb, buying the entire container of herbs adds up to one hefty grocery bill.
It is a very good reason to grow your own herbs and why most people do. And not all of us have that large garden plot to grow our herbs, so many of us resort to window boxes, window sills or containers. A window herb garden doesn’t require very much attention, just a box, some seeds, a touch of fertilizer and dirt, some water and a bit of love.
Herbs aren't very difficult to grow. As long as you pay attention to them and give them lots of water when they look a little dry, and you put them in a window that gets a lot of sunshine, you'll soon see that your herbs will grow big and strong without you really needing to do anything at all.
Windowsill Herb Garden
Adding Color

The best part about having a window herb garden, except for the fact that you'll have a healthy supply of herbs for all your cooking needs, is that you will add color to your windows. Beautiful greens and whites, some yellows and other lush colors is what you get when you finally successfully grow all your own herbs in your window herb garden. The only difficult part is actually having to grow them!

How To Start

If you don't have a green thumb and you have no idea how to grow anything at all, even weeds, then you should do a little research first. Some stores may sell pre planted herbs that all you have to do is add water to have them grow. But you should be able to look up herb growing on the internet to get all the tips and tricks you'll ever need to grow all your favorite herbs in your own window herb garden.

It then becomes just as easy to get your own pot, seeds and soil and do it yourself. . You'll always have a healthy supply of your favorite herbs so that no matter what herbs you need to cook with, you'll always have them – and they smell good too!

SYS: Save Your Seeds

In the past month or so I let quite a few of my herbs flower and then go to seed. Collecting seeds is a pretty easy (and free!) way to get more plants.
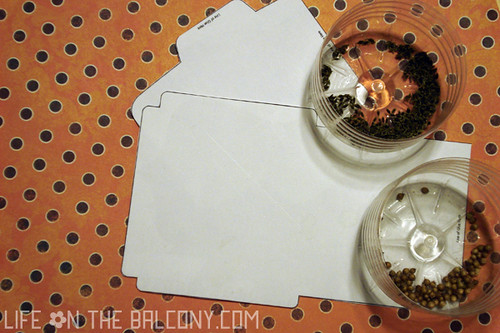
In the photo above I have some dilll and cilantro seeds, and the templates I photocopied from You Grow Girl by Gayla Trail. I am planning on using the orange and brown polka dot paper to make the seed packets.
Saving seeds is pretty easy. When the seed heads were fully formed but still green, I cut them from the plant. I then put them in a small plastic cup and let them air dry. When they were completely dry (it took about 10 days) I removed the stems and was left with what you see in the photo.
Making the seed packets is just as easy. You just trace the template on to the paper, cut, paste, and voila! You can make pretty packets out of patterned paper (check the scrapbooking section of your craft store; even Target has some neat scrapbooking papers) and then host a seed swapping party as Vanessa Richins suggests (anyone in So Cal want to meet at a Coffee Bean and Tea Leaf and swap seeds with me?).  http://lifeonthebalcony.com/sys-save-your-seeds/

Another Frugal Gardening Tip

I’m not even going to bother telling you that times are tough right now. We all know that. But what can frugal minded gardeners do about it?
Well, for starters, you can take cuttings from your existing plants and those of your friends and neighbors (with permission of course). Taking cuttings means free plants. I don’t know about you, but free sounds really good right about now.
These Coleus plants are all from a single plant I purchased for $3.99. When I bought the plant, I had in mind making topiaries, so I was really excited to find a plant with six branches. Immediately upon bringing the original plant home, I cut off the six branches, dipped the cut end in rooting hormone, and stuck the stems in fresh potting soil. A week or so later they were all growing roots. My four dollars bought me six attempts at making a topiary. Less than a buck a plant is pretty darn good!
Now, whenever I pinch off a branch growing too low down on my topiaries, I repeat the cutting process described above and get a new, free plant. I also do the same thing when I trim my mother’s geraniums. And I have had good results with Ivy and Philodendrons by just sticking a cutting in a glass of water until roots have developed.
Have you taken cuttings before? Which plants have you had success with?  http://lifeonthebalcony.com/another-frugal-gardening-tip/

10 Dirt Cheap Ways To Have a Gorgeous Balcony Garden

Gardening can be expensive if you don’t keep an eye on the bottom line. Even gardening in a small space can get out of hand. Here are some tips to keep the spending to a minimum without sacrificing style.
Free:
  1. Save seeds from plants you already have, from plants growing in the wild, or ask your friends for seeds from their plants. Your friends will be more willing to give you some of their seed if you offer up some of yours.
  2. Take cuttings. Again, consider your own plants, plants you find growing elsewhere, and offer to trade cuttings with your friends.
  3. Divide and conquer. If any of your plants are a bit over grown, you could divide them and offer to trade your gardening buddy for one of her divisions.
  4. Take a good hard look at your food. Did you just pick up a container of heirloom tomatoes from the Farmer’s Market? A couple of those tomatoes have enough seeds to make quite a few plants. Also, some plants can be started from leftovers. For example, a new pineapple plant can be started from the top portion you sliced off before eating it.
  5. As far as containers go, look around for things you are not using that can hold soil. Don’t pass by a possibility just because it doesn’t have a drainage hole. You can drill a hole into more materials than you’d think.
Pretty Darn Inexpensive:
  1. Seeds. Most seeds I’ve purchased cost me less than $2 per packet and come with enough seeds to make 50-100 plants. We’re talking a few cents per plant here!
  2. Cheap plastic and terra cotta pots can be improved with a little paint. I think the best effect is achieved when you spray paint a pot a bright color like fuchsia or lime green. Or use painter’s tape to make stripes. Just stay away from the faux finishes unless you’re a pro. A lot of amateur faux finish jobs look too faux, if you catch my drift.
  3. Shop yard sales in nice neighborhoods for their garden cast offs. This would be a great place to find pots, plants, tools, etc.
  4. Buy plants at the right time of year for the best deals. The best time to check for sales on annuals is just after Memorial Day. Buy perennials late in the season. You can get some pretty good deals on plants in September and October.
  5. Make your own fertilizer by composting your kitchen scraps. Both Juggling Frogs and You Grow Girl have discussed vermicomposting (composting with worms) recently, which can be done in the space underneath your kitchen sink, without any smell or hard work.  http://lifeonthebalcony.com/10-dirt-cheap-ways-to-have-a-gorgeous-balcony-garden/

Dirt-Cheap Ways to Grow a Garden

These days, it's money that makes a garden grow.
Gardening has long been one of the top leisure activities for many Americans. But green thumbs are finding that this hobby can quickly become quite expensive.
It doesn't have to be. With a little bit of effort and keeping an eye open for plants that are looking for a good home, you can fill your garden without emptying your wallet.
In fact, beautiful gardens can be created at a very low cost, and many plants can be obtained at no charge.
Here are 10 great ways to build your garden with plants that don't cost a dime:

1. Look for Unloved Plants


You probably think your local nursery will have the highest prices for garden plants. That's probably true if you are looking for plants in the main retail area. But frugal gardeners look behind the building to find free plants.
Plants that don't look healthy won't sell and take up valuable retail space, so they usually end up back by the trash bins. Most people who run nurseries hate to throw out any kind of plant -- no matter what condition it's in -- and will usually let you take any plant you'd like.
Simply ask the manager if there are plants that can't be sold, and if you may claim them. While they won't look as beautiful as those on the retail floor, these plants (especially any that are native to your area), with a little bit of care, can be nursed back to health in no time.

2. Bartering and Trading


If you want to be a little more choosy when it comes to plants for your garden, consider bartering with a neighbor. This works especially well if you have junk lying around the house that you no longer want or need.
The stuff doesn't even have to be garden-related. This is also a great way to get gardening tools and supplies that can cost a pretty penny when purchased brand new.

3. Plant Rescues


Simply keep your eyes open when driving down the street, especially on trash days. Many people move during spring and abandon their plants in the process.
While you are likely to find more houseplants this way than garden plants, they are still worth rescuing, even if you don't plan to keep them. These plant rescues are excellent for trading and bartering. While it may be an extra step, it still will allow you to get free plants.

4. The Internet


The Internet is a wonderful place to pick up free plants. FreeCycle will allow you to makerequests for free plants, which should get you plenty.
People who are moving who are a bit more organized will try to find homes for plants they won't be talking with them. Most gardeners love to share extraplants that they have when preparing their own spring gardens.
People who are doing new landscaping often have perfectly good plants that don't fit their new look that are in need of a new home. Free plants can also be found by placing wanted ads through CraigsList

5. Dig Your Own Plants


While this will take a little muscle work on your part, there are often offers by homeowners where you can take any plants that you dig yourself. These property owners need to get rid of plants for many reasons but don't want to put in the labor to dig up the plants themselves.
If you are willing to dig them up, they are yours for the taking. These can be found on Web sites such as CraigsList and in the classified section on local newspapers.

6. Landscaping Crews


An often overlooked place to find free plants for your garden is from landscaping crews. Landscaping crews are usually paid to keep landscape fresh and in season meaning that they often take out perfectly good plants that just happen not to be at their peak.
These plants usually are thrown out or composted even thoughthey are still in good condition, but the crews will often be willingto give you them for free if you ask.
This is especially true if they need to pay to haul them away. In this case, giving them away to you will actually save them money.
During spring you should be able to find crews alongside the road who you can ask, but you can also use the Internet or phone book to find local landscapers in your area to see if they have extra plants from jobs.

7. Gardening Friends


Friends who also garden can be a wonderful sourceof free plants for your garden. Most gardeners have extra plants thatthey are more than willing to give away.
Even if they don't have full plants to give away, most will have new starts from dividing their established plants or cuttings that can be used to begin growing new plants.

8. Participate in Community Garden Groups


If there is a local garden group that you can join, this is an excellent way to get free plants through other members and through projects that you may undertake.
It's also a great place to get quality gardening information and toget answers to all your gardening questions.

9. Join a Gardening Forum


If there are no garden groups in your community, another option is to join a gardening forum. The key to be successful in getting free plants is to be an active participant in the forum.
Most gardeners are more than happy to help out people whomthey have come to know, but many also takea dim view of those who pop in for the sole purpose of trying to getfree plants.

10. Keep an Eye Open for 'Volunteer' Plants


Your own garden may provide you with free plants that you never expected. Plants that grow unexpectedly from seed in the early spring are called "volunteerplants," because they volunteer to be part of your garden.
When they appear, these plants can be dug up and potted and then replanted in the garden when they grow bigger.
While creating a new look for your garden can be expensive, using the tips above can greatly reduce the costs while giving you a large variety of new plants to add to your garden this season.  http://www.thestreet.com/story/10409962/1/dirt-cheap-ways-to-grow-a-garden.html

Hanging Flower Baskets


Hanging Flower Baskets
Hanging flower baskets are a wonderful way to add color and fragrance to the exterior of your home. Depending on the flowers used, hanging baskets can last a very long time. They are easy to build, grow and maintain. A well manicured hanging flower basket will keep its color long after most flowers have wilted for the season. Hanging baskets can be brought indoors as well. This allows you to keep your plants out of harsh weather, and bring some color and fragrance inside.
Getting a hanging flower basket started is a simple task. You can either buy baskets or make your own. There are many different styles of baskets to choose from if you choose to purchase one. There are a few things to consider first before purchasing your basket. Consider where you would like to hang the flower basket, and what types of plants to grow.

Hanging Flower Basket
Plants to use


For baskets that are going to be exposed in full sun Bacopa, Felicia, geraniums, helichrysum, lobelia, lotus vine, marigolds, nemesia, petunias, scaveola, tagetes, trailing schizanthus, verbena are good plants to grow.
For Baskets that are going to be kept in mostly shaded areas Alyssum, fibrous begonias, fuchsias, ivy geraniums, hedera, impatiens, trailing ivy, lobelia, tuberous begonias are good choices.

Materials needed

  • A basket, wire or plastic
  • A liner. Sphagnum moss or a synthetic liner made from coconut fibers or wool. You can use bamboo leaves, fern fronds or even phormium swords as an environmentally friendly alternative to sphagnum moss.
  • Potting compost
  • Fertilizer. A small amount of time release fertilizer is a great option
  • Plants

Assembly: Wire Hanging Basket

Line the basket with the sphagnum moss or other liner. This holds everything together and will help retain moisture. Cover the bottom of the basket with the potting compost, pressing down to eliminate air pockets.
Now you’re ready to start planting your plants. To achieve a nice full flowering basket, it is important to plant in layers. Start at the lowest layer with trailing plants; use the middle layer for hanging plants, building up to the top layer for tall, upright plants. Lay bedding plants on the compost through the wire mesh from the outside. Press down to secure roots in place. When this layer is fully planted, cover well with compost to make the next layer. Continue to fill the basket with plants followed by layers of compost to within two inches of the rim.
The top layer can be planted with taller plants. Geraniums and Marigolds are good choices for this layer. Remember that these plants will spread so do not overcrowd the hanging basket.
Attached your chains or wire to hang the basket from, making sure that they are strong enough to handle the weight. Hang the basket in the desired area, water and enjoy.
Remember to feed, water and deadhead (remove dead flowers and blooms) the basket regularly. This will help your hanging flower basket grow and last all summer long. Pruning helps plants grow larger, bushier and promotes additional flowerings. So don’t be affair to trim and prune plant growth that trails too far.  http://www.workingoutside.com/gardening/hanging-flower-baskets

Watering and Feeding Hanging Baskets

The best time to water hanging baskets is early in the morning, so that the plants are prepared for the coming day. In the heat of summer, plants need plenty of water and should be checked at midday, if possible, and in the evening too. Multipurpose compost is difficult to rewet once it dries, so water regularly and mix swell gel into the compost to prevent it drying out completely. It’s a good idea to put a container display underneath your hanging basket to catch the drips, rather than allowing excess water to drain away.
hanging baskets1 Watering and Feeding Hanging Baskets
The best, and safest, way to water a hanging basket is using a “lance.” which delivers water right into the heart of the basket and helps to avoid wetting the foliage and flowers, which can damage them and encourage disease. You can make your own lance by attaching a hose to a bamboo cane, leaving the end of the hose overhanging by 6 inches to create a bendy “spout.” This is much safer than standing on a ladder and watering with a can, but if you have to do this make sine the ladder is secure and the watering can is lightweight and filled only with as much water as you can carry safely. It’s easier to have a tall stepladder and hold the can at arm’s length than trying to water at head height. Ideally, install an irrigation system??it saves considerable time and effort and makes watering more efficient.
Plants in hanging baskets need regular feeding as there arc-lots of roots packed into a small space. Until the plants are established, feed at the same time as watering using soluble plant food dispensed through a container at the end of the hose. Alternatively, you can use a lightweight watering can or add slow-release fertilizer to the compost mix. Start with general fertilizer, then change to a high-potash fertilizer, such as tomato feed, once the baskets are established; apply once a week to boost flowering, feed regularly to prolong the display and check regularly for signs of pests or disease.   http://www.gardeningadviceguide.com/watering-and-feeding-hanging-baskets/

Hanging Baskets for Hummingbirds

Use these tips to create an irresistible floating garden of nectar-rich blooms.

By Kris Wetherbee, Oakland, Oregon

Hanging flower baskets are a great way to brighten the view almost anywhere. But if you plant blooms that also attract hummingbirds, the scene can be even more spectacular.
Imagine several gorgeous hummingbirds hovering around your hanging baskets, each vying for a dining spot. And once they find your flowers, it's likely they'll return again and again all season long. Luckily, it's not difficult to make that dream a reality. Just start with the simple tips and ideas on these pages.

1. Select the Right Flowers

There are several factors to consider when choosing flowers that will thrive in hanging baskets and attract hummingbirds.
Nectar. First, look for nectar-rich, tubular blooms, such as those on penstemon, salvia and petunia. Hummers are able to access the nectar easily with their long, narrow bills and tongues.
Plant form. Since hummers typically feed while hovering, flowers that stick out from a plant's foliage, by either protruding or dangling, provide ample air space so the birds' beating wings easily clear any leaves.
Color. People often associate hummingbirds with the color red, and for good reason. These inquisitive birds can see red from a great distance, so offering nectar-rich flowers in crimson shades should always get their attention. However, they'll eagerly sip nectar from flowers in almost any hue, including orange, pink, purple, white and yellow.
Number of flowers. The amount of blooms a plant produces also plays a big role in attracting these tiny birds. Plants with multiple flowers in open clusters are more appealing than plants like hibiscus that feature a small selection of large blooms.
hummingbird
Think about it from their perspective. How much more enticing is a buffet table laden with multiple food offerings than several tables spaced 10 feet apart, each featuring only a few dishes of food?
Bloom time. Plants with a long flowering season will provide nectar for an extended period of time. Another way to achieve this is to choose flowers with staggered bloom times—whether in one basket or by offering several hanging baskets.
hummingbird

2. Basket Basics

Hummingbirds aren't going to care what type of container you use—whether you select plastic, wood, pottery or a wire basket lined with sphagnum moss. However, the size of the planter will affect its upkeep and placement.
Hanging baskets for hummers should be at least 12 inches in diameter. Lightweight pots or smaller containers are easier to handle, but larger containers hold more plants, make for a more eye-catching display and keep plant roots moist longer.
Just remember that a heavy pot or large container can easily weigh 50 pounds or more when filled with damp soil and plants. These will need heavy-duty hooks and require strong support.

3. Compose the Display

The sky's the limit when it comes to the variety of flowers and foliage that work well in hanging baskets. You can always count on traditional hummingbird favorites—geraniums, fuchsias, nasturtiums, petunias, lantana and impatiens, for instance—to create a spectacular hanging display.
But even vines and upright perennials, such as garden phlox, veronica or penstemon, can look attractive in larger baskets and appeal to a hummingbird's appetite. Here are some other design factors to consider:
Color and texture. A combination of both foliage and flowers creates the most alluring effect. For example, the purple foliage of some coral bell cultivars add drama, while the blooms provide nectar. Combine different leaf shapes or forms for a striking arrangement, and create special tactile interest by using plants with different textures.
Height and form. Bring depth and visual interest to your hanging garden by combining plants with staggered heights and habits. For example, you could place mounding or upright plants, such as salvia, penstemon or zinnias, toward the center of the pot, then accent with trailing plants—such as verbena, parrot's beak or trailing petunias—positioned along the outer edges to spill over the sides.
Plant requirements. No matter what combinations you select, be sure that plants destined to share the same basket also share similar water and light needs.
hummingbird

4. Put It Together

Now that you know what you'll be planting, it's time to gather the materials needed to make your baskets. Start with the soil. A good lightweight potting mix is a must, preferably one that includes peat moss and perlite or vermiculite to provide aeration and drainage.
Plan the arrangement. It's a good idea to set out your plants ahead of time to figure out the best arrangement. The spacing needed between each plant will depend on the varieties and the container you've selected, and the nature of the plant's growth habits and characteristics.
Smaller plants can be spaced closer together than larger plants, so the total number will vary. But as a general rule, a 12-inch container will house about five to seven plants. Wire baskets fit more plants since you can also plant in the sides.
Time to plant. Once you've determined the arrangement, fill the pot two-thirds full with potting mix and plant the largest plants and those in the center first, followed by the smaller plants and those around the outer edges of your container.
Be sure to place the plants at the original depth as they were in their containers. Then secure them in place with additional soil and water well. Wire baskets are a bit different because in addition to the top, both the sides and even the bottom of the container can be planted, creating a colossal sphere of living color.
Line the basket with a thick layer of damp sphagnum moss or a preformed fiber mat liner. Plant the bottom and sides by poking holes through the moss or liner and gently pushing in the plants' roots from the outside. Add potting mix and secure the roots as you work your way toward the top of the basket. Then plant the surface as you would for a regular basket.
hummingbird

1. Hang It Up

When hanging your basket, choose a sunny, sheltered location within easy viewing range so you can watch the hummingbirds up close. Or, if your basket contains low-light garden plants, pick an appropriate spot in the shade.
And don't limit locations to areas near windows—think of the other places you spend time outside. Add pizzazz to boring entrance areas by hanging several baskets near the front door, bring a new dimension to walls and doorways, or add colorful charm to a courtyard. Or, why not expand your hanging garden to a balcony, arbor or gazebo?
Wherever you decide to hang your hummingbird garden, be sure to include a comfortable place nearby where you can sit back, relax and enjoy the view.
Editor's Note: Kris Wetherbee is the author of Attracting Birds, Butterflies & Other Winged Wonders to Your Backyard.   http://www.birdsandblooms.com/Birds/Hummingbirds/Hanging-Baskets-for-Hummingbirds

How do I save tomato seeds?

Saving tomato seeds is not difficult, but you need to use open-pollinated varieties (as most heirloom tomatoes are) in order to have them grow true to type.
1. Start by taking the best tomatoes from a number of plants of that variety will give you a good genetic mix. They needn't be rotten, just ripe.
2. Cut the fruits in half at their waistlines, and squeeze their seeds into a labeled container such as a glass jar.
3. Add several inches of water to the jar and set it aside, out of direct sunlight but in a warm spot. A flotilla of fungal matter will form after a few days, but you may cover the jar to avoid the smell, deter fruit flies and prevent a tidy family member from throwing out the whole thing. Keep the lid loose, though, to encourage the fermentation that is the key to this little operation. The gel coating that has kept the seeds from germinating will break down, and any good, viable seeds will sink to the bottom. Stir from time to time.
4. After no more than five days, spoon off and discard the moldy debris on the surface, and pour off the water. Add fresh water to the seeds, stir and let them settle again. Do this until the seeds are clean, then drain them well in a fine strainer and spread them on a screen or a plate so that they'll dry quickly, out of the sun.
5. When they are absolutely dry and are easily separated with your fingers, they can be stored in an airtight jar or plastic bag and will keep for at least five years.
Source: Barbara Damrosch  http://kitchengardeners.org/questions/how-do-i-save-tomato-seeds

Monday, April 25, 2011

Daily Garden: Rose Garden

rose garden by suzman cole  
Have I ever mentioned that I L.O.A.T.H.E rose gardens in the typical English public park garden setting. You know the ones where 5 million different roses are painstakingly grown in rows and patterns with absolutely nothing else. UGH. I don’t think there could be a more irritating garden…..but this, AHHHH, this is wonderful. A rose garden that I could promise.   http://www.studiogblog.com/plants-natives/plants/daily-garden-rose-garden/

Daily Garden #2 : My Shed Garden

I know we already had one Daily Garden today….but I just don’t want to put this off until monday….now that I have these images uploaded from my camera I am giddy to share them with you.
rochelle greayer studio 'g' garden studio g digitalis foxglove daylilies orange door
I got a Macro Lens for my birthday and I have been doing a little playing around with it. My Foxgloves are just about to go off now, but I snapped these pictures about a week ago. This little corner of my own garden is about the only area I am mostly happy with at the moment. I look around and all I can see is projects. When I get overwhelmed (constantly) I cast my eyes back to this, take a deep breath, put my head down and keep chugging away in other areas. Eventually it will all be this beautiful and I can look in any direction I want from my garden chair (which desperately needs to be repainted) and feel the smug satisfaction of “yeah, I created that”.
rochelle greayer studio 'g' garden studio g digitalis foxglove daylilies orange door
oh — and the foxgloves (which really are show stopping) — 6′ tall, from seed, scattered haphazardly, 3 years ago, by my then 4 year old.