Showing posts with label Vegetables. Show all posts

Monday, April 11, 2011

Vegetable Garden Design


Raised beds help keep vegetable gardens neat while maximizing the planting space.


Plan your vegetable garden to have maximum space for vining vegetables, such as cucumbers, and clearly defined pathways.


Place stepping stones in a large raised bed veggie garden so you don't compact the soil when working.


Mix and match colors and textures of flowers and vegetables to create a stunning visual effect.


Tepee trellises let tomatoes grow in their natural form, yet keep them upright, making more room for herbs and flowers to grow.
My first memories of vegetable gardening were following my Italian grandfather around his farm in Connecticut and helping him hill potatoes and tie up tomatoes. Probably the fondest remembrances were harvesting and eating the produce in July when the garden seemed to overflow with vegetables. Luckily these memories have overshadowed recollections of weeding on hot, humid summer days.
That was 40 years ago and I'm still vegetable gardening. However, I've learned a bit since then. Now I experiment with new varieties, plant combinations, and techniques to make my vegetable garden a productive, fun, and attractive part of my yard. Vegetable gardens can be as beautiful as any flower garden while also providing food for the table. All it takes is a little planning. While I tuck vegetables here and there in flowerbeds, I also like having a main vegetable garden area to concentrate the food production. The main vegetable garden doesn't have to be all veggies, though. Feel free to include herbs, edible flowers, and fruits.
While I make discoveries every season, I've settled on a vegetable garden layout using raised beds. For me, it's the key to a beautiful and productive garden. First, let's review the basics of vegetable gardening, then we'll talk about building raised beds.

Choose a Sunny Location

It's critical to choose a sunny spot for growing vegetables. Most fruiting vegetables need 6 to 8 hours of direct sun a day for best results. Leafy greens, such as spinach and lettuce, can thrive with a bit less direct sun. If you assess your yard in winter, remember that deciduous trees that are then leafless will cast shadows as the growing season progresses.
The best location for the vegetable garden is close to the kitchen so it's easy and convenient to visit. In addition, it helps if you can view the garden from a window. When the garden is easy to see and reach, you are more apt to notice what needs to be tended and to take full advantage of the harvest.
While the ideal garden location has loose soil that drains well, don't fret if your soil is less than ideal. You can improve it over time by adding organic matter, such as compost, or create raised beds on top of poor soil by bringing in the amount of topsoil and compost you need.

The Right Size Garden

A 20- by 20-foot garden will give you room to grow a wide range of crops, including some that need a lot of space, such as sweet corn and winter squash. A 10- by 12-foot plot is sufficient for a garden sampler with a variety of greens, herbs, a few tomatoes and peppers, beans, cucumbers, basil, parsley, and edible flowers such as nasturtiums. I always include flowers in my garden, even if they aren't edible, because they are beautiful to cut and bring indoors. Flowers also attract pollinating and beneficial insects to the garden. By growing plants in succession and using 3-foot-wide beds with 18-inch paths, you should have plenty of luscious vegetables for fresh eating and extras for sharing.
To design your garden from scratch, plot it on graph paper. Use paper with a grid of 1/4-inch squares, with each square representing 1 foot in the garden. Outline the beds in pencil, then fill in the plant names.

Preparing the Garden Space

Once you have a plan, you're ready to measure out the garden. You'll need a tape measure, plenty of string, 1-foot-long wooden stakes, and a hammer to drive the stakes into the ground.
For best sun exposure, orient the garden so the beds run east to west, with the tallest plants on the north end. This will reduce the chance of one vegetable shading another. Following your plan, drive a stake in each of the four corners of the garden.
At this point you'll need to remove any sod and rototill or turn the soil by hand to loosen the soil and remove weeds. If you're starting in the fall to get a garden ready for spring planting, you have an option that will save you some hard work. Mow the area close to the ground and lay three to four layers of black and white newspaper over the garden area. Cover the newspaper with a 4- to 6-inch-thick layer of straw, and cover that with a 1- to 2-inch-thick layer of compost. The newspaper/straw/compost combination will kill the grass and weeds and provide a great habitat for earthworms to work the soil. By spring the grass will be dead and decomposing and you can work the soil.
Before you plant, have the soil tested to determine the soil pH and nutrient levels. Most vegetables require a pH between 6.0 and 6.8. Add limestone to raise the pH in high-rainfall areas; add sulfur to lower the pH in the arid West. Your state university's cooperative extension service or local garden center will have information on obtaining a soil test kit.

Lay Out the Beds

Now it's time to lay it all out. Measure, stake, and outline each bed with string. To make a raised a bed, first loosen the soil using a shovel or a garden fork, then shovel soil from an adjacent path onto the bed.
Keep adding soil until the bed is about 8 to 10 inches tall. Smooth the soil on the surface of the bed by raking it flat with an iron rake. Draw the soil evenly between the string boundaries, letting excess soil fall off the edge of the bed outside the string. The object is to end up with a flat-topped raised bed that extends fully to the string boundaries about 8 inches above the pathway. Raised beds can be any shape you want as long as they aren't wider than 3 feet. The center of a bed is hard to reach if it's any wider than that.

Feed the Soil

It's easier to address the soil's long-term nutrient needs before planting rather than after veggies are already growing. I build up the soil with natural fertilizers and compost. It may take time to build fertile, rich soil using organic fertilizer and amendments, but the nutrients from organic products are released into the soil slowly, providing weeks of nutrition to the plants. Once each bed is formed, add a 1- to 2-inch-thick layer of compost over the surface and work it into the soil with your rake. Use supplemental organic fertilizers to correct nutrient problems discovered in the soil test and to side-dress vegetables during the growing season. These fertilizers can be in granular or liquid form.

What to Eat?

Now comes the fun part -- deciding what to grow. The simplest, and seemingly most obvious, way to decide what to grow is to think about what vegetables you like to eat. Even though beans are one of the easiest vegetables to grow, if you hate beans, don't grow them! That being said, if you love peanuts and live in Minnesota, you may want to pass on trying to grow this heat-loving crop. Beans, squash, tomatoes, lettuce, and greens such as Swiss chard and arugula, are probably the easiest vegetables to grow. Once you decide on your favorite veggies, then you need to know how to plant them.
Many vegetables are best started from seeds sown directly in the ground (direct-sown); others go in as seedlings. You can grow your own seedlings indoors or buy them. In early spring, a week or two before the last frost, direct sow crops that grow best in cool weather, such as beets, carrots, parsnips, peas, radishes, spinach, Swiss chard, and turnips, as well as the many delectable exotic greens such as arugula, Asian mustards, and mesclun mix. These greens grow particularly fast from seed. After the last frost, direct-sow warm-weather vegetables, such as beans, cucumbers, corn, and squash. Among herbs, dill, basil, and cilantro are sure bets from direct-sown seed.

Transplants

Some vegetables need to be planted outside as transplants because they take so long to mature. Others just grow better from seedlings versus seed sown in the ground. Broccoli, Brussels sprouts, cabbage, and cauliflower can be started either way but setting transplants outside usually works best. Eggplants, leeks, peppers, and tomatoes need to be started from transplants because they need such a long growing season.

Right Time to Plant

The average date of frost in spring is the key date to use in garden planning. If you don't know the date for your region, check with your local cooperative extension service or garden center.
You can safely plant the cool-season vegetables, such as broccoli, Brussels sprouts, cabbage, celery, parsley, peas, radishes, and spinach, a few weeks before the last frost date. In mild-winter climates, these crops are usually planted in fall for a winter garden. Arugula, beets, leaf lettuce, parsnips, potatoes, and Swiss chard are a bit less frost-hardy but still grow well in cool weather. Plant warm-season vegetables, such as green beans, corn, cucumbers, eggplant, melons, peppers, summer squash, and tomatoes only after the threat of frost has passed.

Special Tips and Techniques

There are special tips and techniques that can make your veggie garden more efficient and productive. One of my favorites is succession planting. A good example of succession planting is growing a warm-season crop such as beans in the same spot where you just harvested a cool-season crop such as spinach. In most areas the spinach is finished early enough in the season to allow you to plant a mid-season crop of green beans that will mature before frost.
Interplanting is another way to maximize your planting space. Plant quick-maturing crops, such as lettuce, around slow growers, such as broccoli. The lettuce will be harvested by the time the broccoli needs the space.
When growing more than one of any type of vegetable -- tomatoes, for instance -- plant several different varieties. This increases the chance of success, since some varieties will perform and taste better than others. It also extends the harvest season if you plant early, mid- and late-season varieties.

The Miracle of Raised Beds

In general, raised beds are the best way to grow the most vegetables with the least amount of work. That's my kind of gardening. The only times I'd recommend not using raised beds is if you have sandy soil, live in a very dry area, and are growing crops that need hilling and mounding, such as potatoes. Otherwise, raise the soil!

The Benefits of Raised Beds

  • They warm up and dry out faster in spring, so plants get a jump on the season.
  • You can grow more vegetables in less space and have less area devoted to paths.
  • They create attractive, well-organized planting areas.
  • They save on the amount of fertilizer and compost used because it's concentrated just on the planting beds.
  • It's less work, especially if you make permanent raised beds bordered with wood, bricks, or stone. You won't have to remake the beds each spring.
  • The plants will have healthy root systems because you won't be stepping on the planting bed, compacting the soil, and making it hard for roots to grow.
  • You can be more creative with design, making round raised beds for example, and planting vegetables, herbs, and flowers in various designs on the raised beds.
  • It's easy to plant climbers such as cucumbers up an A-frame trellis because it fits nicely over a 3-foot bed.
  • It's easy to fit season extenders such as row covers with wire hoops over the 3-foot beds.
  • Most important of all, raised beds are beautiful!  http://www.garden.org/ediblelandscaping/?page=veg-garden-design 

Thursday, April 7, 2011

Daikon seeds and Nimono recipe


Today was a perfect day to go out and start Flowers and seed window shopping...
Actually for seeds was shopping, for the flowers I will do it by the end of March.
Look like I wasn't alone. Many guys were also doing gardening shopping. Figure :))
First stop, Loews and then Home Depot.
Off course I start to get Herbs seeds for my cooking, and my joy was finding daikon seeds.

I will try to grow daikon, this is my spring challenge, the only problem is finding a tall vase. No problem at all, so many tall vases.....is everyone growing Daikon???? Well,
before I do write any suggestion and please leave a comment.
But before you do, there is a simple recipe and I challenge all of you to cook it.
Let's see how many will prepare it, we can exchange information during our getting together lunch.

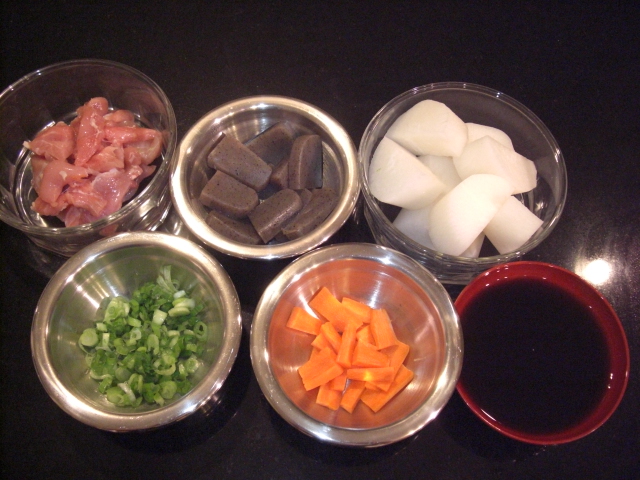
Chicken and daikon Nimono


Yield: 2 servings
Time: 40 minutes
Ingredients
  • 1/4 daikon (about 1 lb, cut into 2″ thick half circles)
  • 1/3 lb boneless thigh chicken
  • 1/3 cup diced carrots
  • 1/2 konnyaku (1/4 lb)
  • 1/4 cup green onion (chopped)
Spices
  • 3 tbsp soy sauce
  • 2 tbsp sake
  • 2 tbsp mirin
  • 1 tsp hon-dashi (soup stock powder)
  • 2 tbsp sugar
Preparation
  1. Mix all spices in a bowl (soy sauce, sake, mirin, hondashi and sugar).
  2. Boil konnyaku for 3 minutes, strain, and set aside.
  3. Add 3 cups of water and daikon in a sauce pan and bring to a boil. Cook for 5 minutes.
  4. Remove daikon, set aside, then add chicken and boil for 5 minutes. Skim the top
  5. Add mixed spices, stir then add daikon, konnyaku, and carrot, cover with lid, and cook for 20 minutes over medium heat.
  6. Add green onions and serve.
   http://justnihonkai.blogspot.com/

Growing Kale, Planting Kale, How to Grow Kale

growing kale

Tips for growing kale in home vegetable gardens. Learn how to plant, grow, and care for kale plants in your garden. Kale is a member of the brassica or cabbage family; along with cauliflower, brussels sprouts, and collard greens.
It is considered a cool weather vegetable.
Kale is frost tolerant; and the taste grows sweeter after the plant is exposed to a frost.
Kale is rich in many important nutrients such as calcium, iron, vitamins C and K, and Carotenoids.
Kale is thought to be the hardiest of all vegetable plants.
It is also usually not susceptible to garden pests or diseases.
Ornamental kale plants are often used for their colorful purple and green leaves as a winter-growing decorative plant.


Planting Kale

The vegetable kale can reach up to 12 inches high and spread as far as a foot.
Growing kale can tolerate partial shade as long as the plants receive five hours of sunlight per day.
The plant is very frost tolerant and can survive heavy frosts. Kale prefers a pH level of 6.0 to 7.0.
The hardy cabbage has curly dark green leaves and no heart. Although, we still love the vegetable!


In springtime, plant kale five weeks before to two weeks after the last expected frost.
In the autumn, kale can be planted six to eight weeks before first expected frost.
The flavor of the fall crop is best when kale is put on hold until after first frost.
growing kale

How to Grow Kale


  • Plant kale seeds at a planting depth of ¼ to ½ inch.


  • Space plants in rows of 12 to 18 inches.


  • Spacing of beds should be 10 to 15 inches apart.


  • The best soil temperature for germination is 40 to 70 degrees F.


  • The ideal soil temperature for growing kale is 60 to 70 degrees F.


  • Days to maturity is 55 to 75 days after direct seeding in the vegetable garden.


  • Expect a harvest in 30 to 40 days from transplants.


  • Kale does not typically grow well in the greenhouse.


  • Any variety can be successfully grown in eight inch wide containers that are eight inches deep.


  • Caring for Kale Plants in the Garden


    Meeting the water requirements for growing kale is important for good production.
    Make sure the plants get at least one inch of water each week from watering or rainfall.
    Kale likes lots of water so for maximum productivity give it up to a half inch more than normally required every week.


    Apply compost or timed released fertilizer in spring. Give the plants monthly supplemental light feedings of foliar spray or side dressings throughout the season.
    Kale is known as a heavy feeder. For maximum production, in addition to the aforementioned once a month spring feeding, a second light feeding can be applied every two weeks during the growing period.
    growing kale


    Growing kale plants especially benefit from a side dressing when the plants are six to eight inches high.
    Additionally, use foliar sprays of liquid seaweed extract several times throughout the entire growth cycle.


    Harvesting Kale


    Depending on the variety, kale plants should have tender, crisp bright green to blue-green colored leaves at harvesting time.
    Frost improves flavor of growing kale, so wait until after the first frost to harvest.
    You can expect to yield 15 to 30 pounds of kale from a 24 square foot vegetable garden bed.
    One bushel equals 18 pounds.


    Storing Kale


    Generally, 6 to 9 quarts can be canned or frozen from one bushel of fresh kale.
    To keep fresh kale up to 2 weeks, refrigerate in plastic bags.
    For a longer term storage method, mulched kale survives in the vegetable garden for two months from first frost.
    The produce can also be canned or frozen and kept for a year.

    How to Grow Leeks, Planting Leeks and Growing Leeks


    how to grow leeks

    Learn how to grow leeks in your home vegetable garden and how to plant leeks in easy-to-follow steps for gardening success!


    This cold season type of vegetable is easily grown. The ideal soil temperature for growing leeks is 75 degrees F but can withstand a minimum of 40 degrees F. The annual leek plant is a member of the onion family. Its white stem topped with deep-green foliage is valued as a mild flavoring to culinary dishes. Growing leeks mature slowly but are well worth the wait, especially considering their expensive prices at produce markets!


    How to Grow Leeks by Direct Sowing

    Plant leek seeds at a depth of ½ inch in early spring. Planting time is in late autumn for reverse season climates. Germination is typically 10 days to 2 weeks.


    Ideal Soil for Growing Leeks


    how to grow leeks

    Have soil tested for adequate levels of nitrogen, phosphorous, and potassium. Maintain a 6 -6.8 pH level by achieving a balance of equal parts of native soil, sand, compost, and well-rotted manure. Prepare trenches 5 inches deep spaced 6-10 inches apart to receive transplants.


    How to Plant Leeks in the Garden from Seedling Transplants

    Sow leek seeds indoors 1/8 inch deep, 1 inch apart, in flats filled with loose enriched potting soil at least 3 inches deep. Transplant into the garden when plants are three inches tall, spacing them 2-4 inches apart.


    Caring for Leeks

    Water growing leeks only when soil is dry to the touch.
    If weather turns cold, cover garden bed with mulch to insulate the vegetable plants. To mulch, apply sand mulch to each stem just below the leaf junction. Add more as the crop grows until the trench is filled and forms a mounded row.
    • Avoid applying sand mulch around crops higher than their leaf junctions to prevent sand lodging in the leek's leaves and stem.


    Companion plants for Growing Leeks

    • Companion plants for growing leeks are carrots, garlic, celery, and onions.


    Vegetable Gardening Tip for Growing Leeks

    Seedlings are tedious to thin and weed. Do not pull growing leeks up as unwanted grass!
    how to grow leeks

    How to Grow Leeks : Harvesting Leeks

    Growing leeks are durable vegetables, which grow to maturity in 120-170 days. Leek loses little of its flavor or texture waiting to be harvested. Many annual bulb and tuberous vegetables such as leek, kale, shallot, and sweet potato tolerate long in-ground holding periods and will wait on you for a convenient harvesting time. Produce can be gathered when stems reach 1-2 inches in diameter and the leaves reach 6-8 inches in height. Harvest from maturity until the first hard frost.
    • Vegetable gardening tip for growing leeks:
    For longer harvests, leek plantings must be sequenced. Allow three weeks between planting. In colder temperature areas, cover the garden bed with straw mulch to hold soil temperatures through early winter.


    Leeks offer Sweet and Delicate Taste


    how to grow leeks


    The mild flavor of leeks makes a perfect accompaniment to potatoes, yams, and other mild flavored tubers. Leeks are a primary ingredient in vichyssoise, a creamy cold summer soup. Leeks are the sweetest with the most delicate taste of all onions.


    How to Grow Leeks : Storage of Harvested Leeks

    Gather growing leeks as needed, as they do not store well out of the vegetable garden. Once harvested, they will keep for one to two weeks in the refrigerator when stored in a vegetable bag.


    How to Grow Leeks : Varieties of Leek Plants

    Growing leeks come in a wide variety including Arkansas, American Flag, King Richard, Laura, St. Victor, Splendid, Carina, Durabel, Giant Musselburgh, and Unique.


    Preserving Leeks

    Cleaned and chopped leeks may be packed in cup size portions or into ice cube trays and frozen. Each cube equals about 1 tablespoon.


    Vegetable Gardening Tip

    The secret to achieving excellent tasting frozen vegetables is to pick at the peak of ripeness. After picking, immediately immerse the produce in ice water prior to preparation for freezing. The ice water bath halts the ripening process, prevents sugars from converting to starch, preserves flavor, and stops spoilage.

    Growing Chili Peppers, Growing Hot Peppers, Planting Chili Peppers

    growing chili peppers

    The best tips for growing chili peppers in container or backyard vegetable gardens. Learn how to plant chili peppers from seeds or transplants, and how to care for and harvest them.


    Growing Hot Peppers

    Since pepper plants adore the heat, it is a good idea to wait until June before growing chili peppers outside.

    Plant the pepper seeds or transplants outdoors when the nightly temperatures can be counted on to remain above 55 degrees.
    However, the plants' requirement of a long growing season makes it impractical to sow the crops from seeds directly into the garden bed in all but the warmest climate zones.
    Therefore, start your seedlings indoors in April, or purchase transplants from a garden center, unless you live in the tropics!


    Growing Chili Peppers From Seeds


  • Sow 2 seeds to a peat pot, ½ inch deep, and keep them in a hot, bright spot of around 75 degrees to insure proper germination and strong seedlings.


  • About ten days after sowing the seedlings will make their first appearance.


  • Begin a weekly feeding with a solution of liquid fertilizer and water.


  • When it becomes apparent which seedling in the pots is the stronger one, cut off the weakling so that all of the nutrients will go to producing superior seedlings.growing chili peppers


  • Growing chili peppers thrive on warm weather and rich soil.


  • Add aged manure, compost, and 5-10-5 fertilizer of about 5 pounds to 100 square feet to the planting row.


  • When you are certain the night temperatures will not dip below 55 degrees, thin to one plant per pot.


  • Planting Chili Pepper Transplants

    Set the chili pepper plants in the vegetable garden bed at 18 inch intervals.


  • Provide each transplant with a protective cutworm collar. Water the transplants with a mixture of water and liquid fertilizer.


  • If your region experiences occasional cool nights in June, wait before setting the pepper plants outdoors.


  • When the peat pots are filled with roots and you have yet to set the plants in the garden, shift the growing chili peppers into individual 5 inch plastic pots.


  • Shifting the plants into a bigger pot avoids stunting the growth of the chili pepper plants.


  • By allowing additional root room, it buys you more time to wait until the weather warms up before setting the plants out.
    Even if it means waiting a week or so longer, the plants will continue to grow in the pots.


    Harvesting Chili Peppers


    The earliest of the chili peppers should be ready for harvesting in July. Peppers have the same hot flavor at all stages of their growth so they can be harvested at any time.
    In other words, the peppers do not get any hotter the longer they remain on the plant.
    The best vegetable gardening advice for growing chili peppers successfully is to plant a variety appropriate for your area, give the plants a rich well drained soil, and a shovelful of compost under each plant for starters.growing chili peppers


    Trivia: Boys will be Boys When It Comes to Hot Chili Peppers


    Recently, officials in Berlin reported eight teenage boys, ages 13 and 14, were hospitalized after drinking chili pepper sauce more than 200 times hotter than Tabasco in a contest of who could handle the challenge.


    The report out of Germany stated that 10 boys were in on the dare and apparently held the competition at school. Eight of the boys were taken to the hospital after complaining of being sick.
    No report was made on the two young men with the iron clad constitutions that didn't complain!

    The Scoville scale is used to measure the hotness of chili peppers. The number of Scoville heat units indicates the amount of capsaicin contained in the pepper.
    America's favorite, Tabasco sauce has 2500-5000 SHU, whereas the hot sauce the German teenagers drank registered 535,000 SHU.

    Capsaicin is a chemical compound which gives the growing chili peppers its heat. The natural function of the chemical is thought to have evolved as an anti-fungal agent for the plants.   http://www.vegetable-gardening-online.com/growing-chili-peppers.html